操作场景
- 本文档指导您如何在 Jetty 服务器中安装 SSL 证书。
- 本以证书名称ubn.cn通配符证书,域名test.ubn.cn为例。
- Jetty 版本以 jetty-distribution-9.4.28.v20200408 为例。
- 当前服务器的操作系统为 CentOS 7,由于操作系统的版本不同,详细操作步骤略有区别。
- 安装 SSL 证书前,请您在 Jetty 服务器安全组或防火墙开启 “443” 端口,避免证书安装后无法启用 HTTPS。
- SSL 证书文件上传至服务器windows下可使用ftp,linux下可使用winscp、scp、sftp、ftp等工具连接上传。
前提条件
已准备远程文件拷贝软件,例如 WinSCP(建议从官方网站获取最新版本)。 已准备远程登录工具,例如 PuTTY 或者 Xshell(建议从官方网站获取最新版本)。 已在当前服务器中安装配置 Jetty 服务。
操作步骤
1.登录网站控制中心下载证书,可参考帮助文档中,证书下载。
2.解压缩ssl证书压缩包
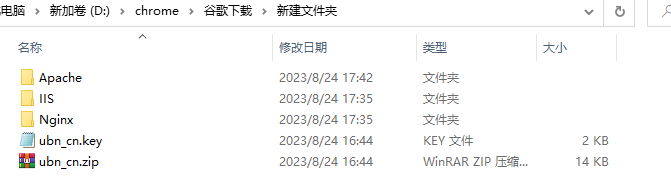
- 解压后文件夹内容:
| 文件名称路径 | 作用 | 使用类型 |
|---|---|---|
| ubn_cn.key | 证书私钥 | iis/apache/nginx通用私钥 |
| Apache/ubn_cn.crt | 证书文件 | apache使用 |
| IIS/ubn_cn.pfx | 证书文件 | iis使用 |
| Nginx/ubn_cn.crt | 证书文件 | nginx、防火墙、cdn、负载均衡、对象存储等通用 |
- 解压后文件示例:
3.转换证书格式,手动转换格式的方式生成jks证书密钥库。
操作方法如下:
访问 转换工具,将 Nginx 文件夹中的证书文件和私钥文件上传至转换工具中(右键分别编辑ubn_cn.key以及nginx目录下的ubn_cn.crt文件,将内容粘贴到工证书文件及私钥文件中),并填写密钥库密码,单击提交,转换为 jks 格式证书。当前 Jetty 服务器安装在 /usr/local/jetty 目录下。
4.使用 “WinSCP”(即本地与远程计算机间的复制文件工具)登录 Jetty 服务器,可参考如何上传文件到云服务器
5.进入部署证书步骤,在 /usr/local/jetty/jetty-distribution-9.4.28.v20200408/etc 目录下执行命令 mkdir cert 创建 cert 文件夹。
6.使用 “WinSCP” (即本地与远程计算机间的复制文件工具)登录 Jetty 服务器,将已获取到的ubn_cn.jks 密钥库文件从本地目录拷贝至 cert 文件夹
7.编辑 /usr/local/jetty/jetty-distribution-9.4.28.v20200408/etc 目录下的 jetty-ssl-context.xml 文件.如下所示:
- 说明
- KeyStorePath:默认值 default 请填写证书存放的路径。
- KeyStorePassword:默认值 default 请填写密钥库密码,指定 keystore 的密码。申请证书时若设置了私钥密码,请填写私钥密码.
- TrustStorePath:默认值 default 请填写证书存放的路径。
<?xml version="1.0"?><!DOCTYPE Configure PUBLIC "-//Jetty//Configure//EN" "http://www.eclipse.org/jetty/configure_9_3.dtd">
<!-- ============================================================= --><!-- SSL ContextFactory configuration                              --><!-- ============================================================= -->
<!--
  To configure Includes / Excludes for Cipher Suites or Protocols see tweak-ssl.xml example at
  https://www.eclipse.org/jetty/documentation/current/configuring-ssl.html#configuring-sslcontextfactory-cipherSuites
-->
<Configure id="sslContextFactory" class="org.eclipse.jetty.util.ssl.SslContextFactory$Server">
  <Set name="Provider"><Property name="jetty.sslContext.provider"/></Set>
  <Set name="KeyStorePath"><Property name="jetty.base" default="." />/<Property name="jetty.sslContext.keyStorePath" deprecated="jetty.keystore" default="etc/cert/ubn_cn.jks"/></Set>
  <Set name="KeyStorePassword"><Property name="jetty.sslContext.keyStorePassword" deprecated="jetty.keystore.password" default="4d5jtdq238j1l"/></Set>
  <Set name="KeyStoreType"><Property name="jetty.sslContext.keyStoreType" default="JKS"/></Set>
  <Set name="KeyStoreProvider"><Property name="jetty.sslContext.keyStoreProvider"/></Set>
  <Set name="KeyManagerPassword"><Property name="jetty.sslContext.keyManagerPassword" deprecated="jetty.keymanager.password" default="4d5jtdq238j1l"/></Set>
  <Set name="TrustStorePath"><Property name="jetty.base" default="." />/<Property name="jetty.sslContext.trustStorePath" deprecated="jetty.truststore" default="etc/cert/cloud.tencent.com.jks"/></Set>
  <Set name="TrustStorePassword"><Property name="jetty.sslContext.trustStorePassword" deprecated="jetty.truststore.password"/></Set>
  <Set name="TrustStoreType"><Property name="jetty.sslContext.trustStoreType"/></Set>
  <Set name="TrustStoreProvider"><Property name="jetty.sslContext.trustStoreProvider"/></Set>
  <Set name="EndpointIdentificationAlgorithm"><Property name="jetty.sslContext.endpointIdentificationAlgorithm"/></Set>
  <Set name="NeedClientAuth"><Property name="jetty.sslContext.needClientAuth" deprecated="jetty.ssl.needClientAuth" default="false"/></Set>
  <Set name="WantClientAuth"><Property name="jetty.sslContext.wantClientAuth" deprecated="jetty.ssl.wantClientAuth" default="false"/></Set>
  <Set name="useCipherSuitesOrder"><Property name="jetty.sslContext.useCipherSuitesOrder" default="true"/></Set>
  <Set name="sslSessionCacheSize"><Property name="jetty.sslContext.sslSessionCacheSize" default="-1"/></Set>
  <Set name="sslSessionTimeout"><Property name="jetty.sslContext.sslSessionTimeout" default="-1"/></Set>
  <Set name="RenegotiationAllowed"><Property name="jetty.sslContext.renegotiationAllowed" default="true"/></Set>
  <Set name="RenegotiationLimit"><Property name="jetty.sslContext.renegotiationLimit" default="5"/></Set>
  <Set name="SniRequired"><Property name="jetty.sslContext.sniRequired" default="false"/></Set>
  <!-- Example of how to configure a PKIX Certificate Path revocation Checker
  <Call id="pkixPreferCrls" class="java.security.cert.PKIXRevocationChecker$Option" name="valueOf"><Arg>PREFER_CRLS</Arg></Call>
  <Call id="pkixSoftFail" class="java.security.cert.PKIXRevocationChecker$Option" name="valueOf"><Arg>SOFT_FAIL</Arg></Call>
  <Call id="pkixNoFallback" class="java.security.cert.PKIXRevocationChecker$Option" name="valueOf"><Arg>NO_FALLBACK</Arg></Call>
  <Call class="java.security.cert.CertPathBuilder" name="getInstance">
 <Arg>PKIX</Arg>
 <Call id="pkixRevocationChecker" name="getRevocationChecker">
   <Call name="setOptions">
     <Arg>
       <Call class="java.util.EnumSet" name="of">
         <Arg><Ref refid="pkixPreferCrls"/></Arg>
         <Arg><Ref refid="pkixSoftFail"/></Arg>
         <Arg><Ref refid="pkixNoFallback"/></Arg>
       </Call>
     </Arg>
   </Call>
 </Call>
  </Call>
  <Set name="PkixCertPathChecker"><Ref refid="pkixRevocationChecker"/></Set>
  -->
</Configure>
8.编辑 /usr/local/jetty/jetty-distribution-9.4.28.v20200408/etc 目录下的 jetty-ssl.xml 文件,修改端口为443。
如下所示:
<Call  name="addConnector">
 <Arg>
   <New id="sslConnector" class="org.eclipse.jetty.server.ServerConnector">
     <Arg name="server"><Ref refid="Server" /></Arg>
     <Arg name="acceptors" type="int"><Property name="jetty.ssl.acceptors" deprecated="ssl.acceptors" default="-1"/></Arg>
     <Arg name="selectors" type="int"><Property name="jetty.ssl.selectors" deprecated="ssl.selectors" default="-1"/></Arg>
     <Arg name="factories">
       <Array type="org.eclipse.jetty.server.ConnectionFactory">
         <!-- uncomment to support proxy protocol
         <Item>
           <New class="org.eclipse.jetty.server.ProxyConnectionFactory"/>
         </Item>-->
       </Array>
     </Arg>
     <Set name="host"><Property name="jetty.ssl.host" deprecated="jetty.host" /></Set>
     <Set name="port"><Property name="jetty.ssl.port" deprecated="ssl.port" default="443" /></Set>
     <Set name="idleTimeout"><Property name="jetty.ssl.idleTimeout" deprecated="ssl.timeout" default="30000"/></Set>
     <Set name="acceptorPriorityDelta"><Property name="jetty.ssl.acceptorPriorityDelta" deprecated="ssl.acceptorPriorityDelta" default="0"/></Set>
     <Set name="acceptQueueSize"><Property name="jetty.ssl.acceptQueueSize" deprecated="ssl.acceptQueueSize" default="0"/></Set>
     <Get name="SelectorManager">
       <Set name="connectTimeout"><Property name="jetty.ssl.connectTimeout" default="15000"/></Set>
     </Get>
   </New>
 </Arg>
  </Call>
9.编辑 /usr/local/jetty/jetty-distribution-9.4.28.v20200408 目录下的 start.ini 文件,添加如下内容:
etc/jetty-ssl.xml
etc/jetty-ssl-context.xml
etc/jetty-https.xml
10.证书已部署完成,在 jetty 根目录下,执行启动命令 java -jar start.jar,即可使用 https://test.ubn.cn 访问。
如果浏览器地址栏显示安全锁标识,则说明证书安装成功。如下图所示:

- 注意事项
证书部署成功后,使用 https://test.ubn.cn 访问若显示如下:
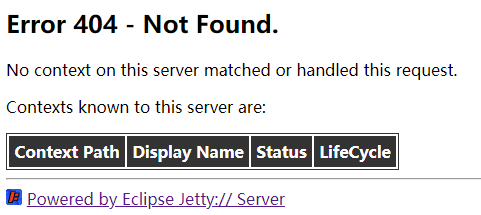 解决方案:您可以将 /usr/local/jetty/jetty-distribution-9.4.28.v20200408/demo-base/webapps 目录下的 ROOT 文件复制到 /usr/local/jetty/jetty-distribution-9.4.28.v20200408/webapps 目录下,重启 jetty,即可访问成功